The Hulk Advanced Wishlist app offers powerful customer management features designed to help store owners segment high-intent shoppers, automate targeted marketing campaigns, and increase account conversions for guest visitors.
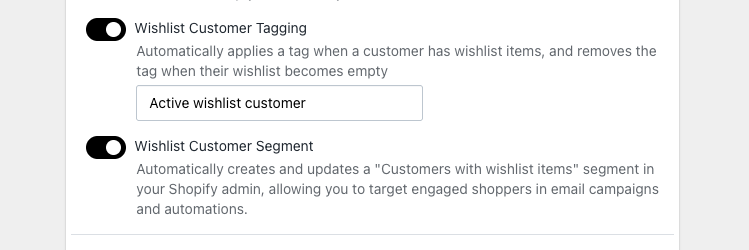
1. Wishlist Customer Tagging
Automatically tag shoppers when they interact with your wishlist to create targeted email campaigns or streamline customer group management.
How It Works
Automatic Tagging: The app automatically applies a custom tag to a customer's profile the moment they save their first item to a wishlist.
Dynamic Removal: If a customer removes all items and their wishlist becomes empty, the tag is automatically removed.
Default Tag: The default tag applied is
Active wishlist customer, but this can be customized to fit your store's tagging strategy.
How to Enable
Open your Shopify Admin and navigate to Apps > Hulk Advanced Wishlist.
Go to Settings > General settings.
Locate the Wishlist customer tagging section and toggle the switch to ON.
Enter your preferred custom tag name (or keep the default
Active wishlist customer).Click Save Changes.
2. Wishlist Customer Segment
Automatically create and maintain a dedicated customer segment inside your Shopify Admin to easily target shoppers with saved items.
How It Works
Automatic Segment Creation: When enabled, the app automatically creates and maintains a pre-filtered customer segment in your Shopify Admin labeled Customers with wishlist items.
Metafield Tracking: The segment is dynamically updated in real-time by tracking a dedicated customer app metafield (
has_saved_items).Shopify Marketing Integration: Use this segment to send targeted emails, launch discount campaigns, or build custom marketing flows in Shopify Email or Klaviyo.
How to Enable:
Navigate to Apps > Hulk Advanced Wishlist.
Go to Settings > General settings.
Locate the Wishlist Customer Segment setting and toggle the switch to ON.
Click Save Changes.
3. Guest "Create Account" Button
Convert anonymous browsers into registered store members by providing a seamless, instant account creation pop-up directly on the wishlist page.
How It Works
Storefront Call-to-Action: Displays a clear account creation button on your main proxy wishlist page (
/pages/wishlist) specifically for unregistered guest visitors.Instant Pop-up Form: Clicking the button opens a clean, interactive customer creation modal directly on the page, allowing guests to create an account and permanently save their wishlist items without getting redirected away.
How to Enable
Navigate to Apps > Hulk Advanced Wishlist.
Go to Settings > General settings.
Scroll to Wishlist page > Wishlist Customization.
Locate the Guest create account button setting and toggle the switch to ON.
Click Save Changes.
Was this article helpful?
That’s Great!
Thank you for your feedback
Sorry! We couldn't be helpful
Thank you for your feedback
Feedback sent
We appreciate your effort and will try to fix the article