Forcing casual browsers to create an account just to save an item can cause friction and cart abandonment. The Guest Wishlist feature allows unregistered visitors to save their favorite items seamlessly without logging in or signing up.
Once enabled, you can track guest wishlist data directly from your dashboard scorecard, which displays the total number of items added by both guests and registered customers.
Key Features
No Signup Required: Allows unregistered users to instantly save items while casually browsing.
Cookie-Based Tracking: Guest wishlists are saved using browser cookies, allowing shoppers to see their items when they return to your store as unregistered visitors.
Automatic Wishlist Merging: If a guest user eventually registers for an account or logs in, their guest wishlist automatically merges with their permanent customer profile.
Post-Purchase Control: Admins can configure whether wishlist items are retained or automatically removed after a user adds them to the cart.
⚠️ Important Limitations for Guest Users
To prevent data loss and ensure security, certain advanced features are restricted. Guest users cannot access the following features until they log in or create an account:
Share Wishlist (Social sharing or email sharing)
Add to Cart directly from the separate wishlist page
Remove Items directly from a dedicated wishlist management page
Note: Guest users must be logged in to view a fully functional, dedicated Wishlist Page with all interactive management features.
How to Enable Guest Wishlist Access
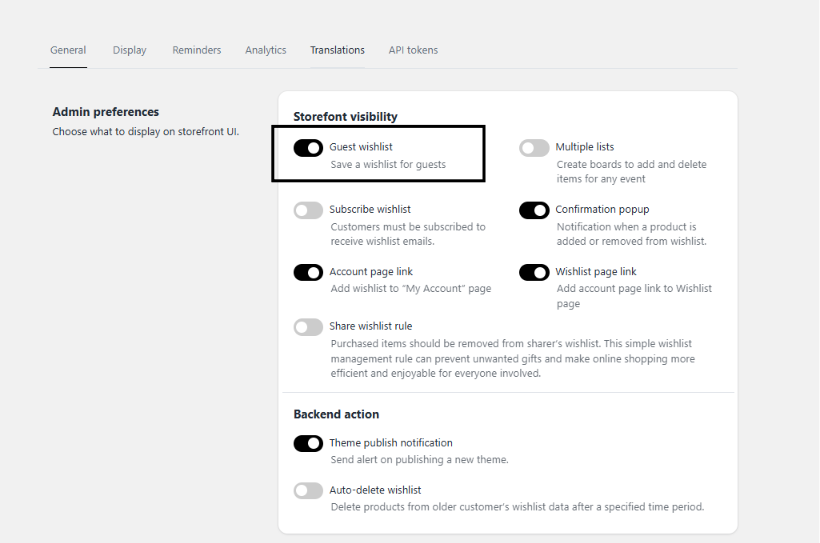
Step 1: Turn on Guest Access
Open your Shopify Admin and navigate to Apps > Hulk Advanced Wishlist.
Go to the App Settings -> General Settings -> Admin preferences section from the main dashboard menu.
Locate the Guest Wishlist option and toggle the switch to Enabled.
Step 2: Configure Cart Behavior
In the same settings menu, look for the item retention preferences.
Choose your preferred setting: Retain items in the wishlist or Remove items from the wishlist after they are added to the cart.
Click Save Changes at the top right of the screen.
Was this article helpful?
That’s Great!
Thank you for your feedback
Sorry! We couldn't be helpful
Thank you for your feedback
Feedback sent
We appreciate your effort and will try to fix the article