By default, autoresponder and notification emails are sent from the app’s default server (info@formsubmitapp.com). Setting up Custom SMTP or SparkPost allows you to send emails directly from your own custom domain (e.g., info@mycompanydomain.com), improving deliverability and presenting a professional brand identity.
1. Setting Up Custom SMTP in Hulk Form Builder
Step 1: Collect Your SMTP Credentials
Obtain the following details from your email provider or IT administrator:
SMTP Host / Server Name: (e.g.,
smtp.gmail.comorsmtp.office365.com)SMTP Port: Commonly
465for SSL or587/25for TLS/STARTTLSUsername: Your full email address
Password: Your account password or a dedicated App Password
Connection Security / Encryption: SSL or TLS
Step 2: Enter Credentials in the App
Navigate to Form Builder App → Settings → Integrations → Domain Setup.
Enter your collected SMTP Host, Port, Username, and Password / App Password.
Specify your From Email (must match your domain email address).
Enable the SSL/TLS option as required by your mail provider.
Save your settings and send a test email to verify the connection.
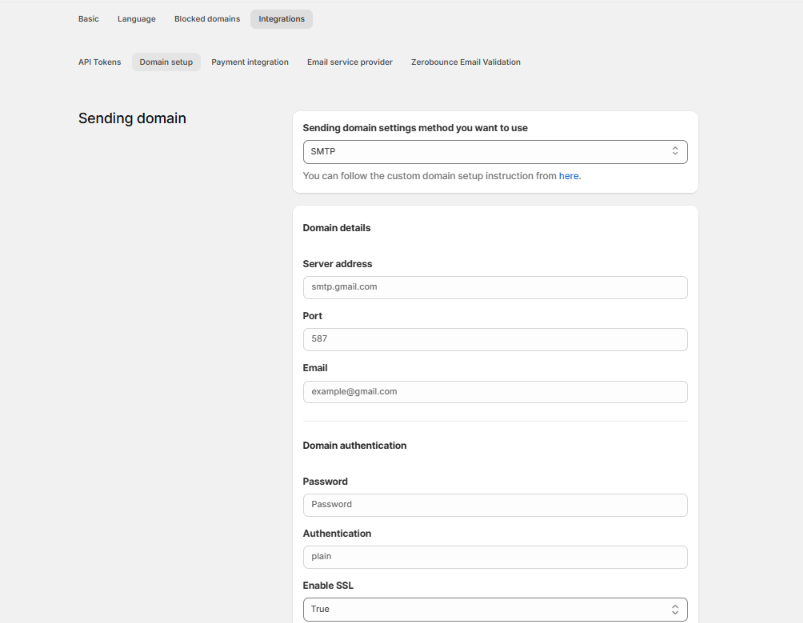
2. Specific Email Provider Configurations
Gmail / Google Workspace Settings
SMTP Server:
smtp.gmail.comPort:
587Authentication: Plain
Enable SSL: True
Requirements:
Ensure IMAP support is enabled in your Gmail settings.
Google requires an App Password (generated in your Google Account security settings) rather than your standard account password.
Microsoft 365 / Exchange Settings
Part A: Enable Authenticated SMTP in Microsoft 365 Admin
Log in to the Microsoft 365 Admin Center.
Select the specific user email account.
In the side panel, open the Mail tab.
Click Manage email apps.
Check the box for Authenticated SMTP.
Click Save Changes.
Part B: Enter In-App Settings
SMTP Server:
smtp.office365.comPort:
587Authentication: Login
Enable SSL: True
3. Alternative: Setting Up SparkPost Integration
To send emails using SparkPost authentication:
Enter your custom domain name in the app.
Log in to your domain registrar (e.g., GoDaddy, Namecheap) and add the specified Hostname and Value records to your DNS Settings.
Complete the domain ownership verification process.
Set up your From: address as instructed in the app settings.
4. Best Practices & Troubleshooting
Avoid Free Email Providers for High Volume: Standard free SMTP accounts (Yahoo, Gmail, Hotmail) have strict daily sending limits. For high-volume transactional emails, use a dedicated email infrastructure provider like Amazon SES, SendGrid, or SparkPost.
Fix Emails Going to Spam: If your notification emails end up in spam, configure an SPF (Sender Policy Framework) record and DKIM key on your domain's DNS settings to authorize the sending server.
Server Rate Limits: Any restrictions on the number of outgoing emails allowed per hour or day are enforced by your email service provider, not the form app.
Was this article helpful?
That’s Great!
Thank you for your feedback
Sorry! We couldn't be helpful
Thank you for your feedback
Feedback sent
We appreciate your effort and will try to fix the article